Monday 29 June 2015

Girly Hat Gift Box

Hi again everyone,

I know, I know... it's been ages since I've posted anything, right?!  But what can I say, life just kind of got in the way of my paper crafting time and with our new addition to the family, and our house flooding in a storm, I needed a little of time just get back to "normality" - Whatever that means, lol!  

Nonetheless, I've dusted my Silhouette off and I'm back in my newly painted craft room - ready to start creating again!

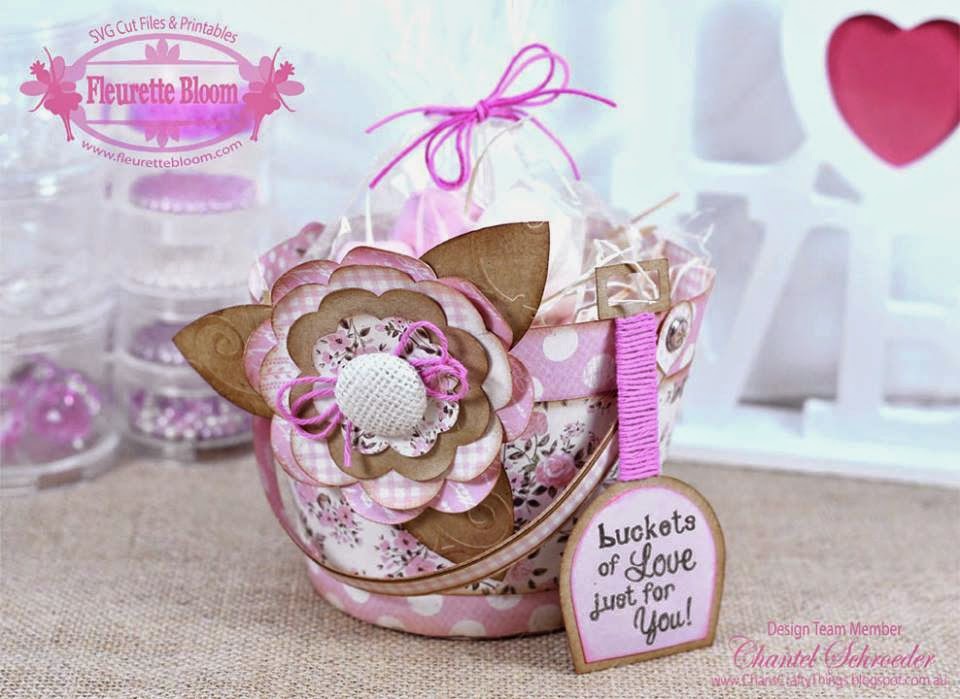
So to get me back into the swing of things, I decided to make this super cute (and super easy) little hat from Fleurette Bloom's awesome new kit - Hooked on fishing.  It's such a fun kit with so many great elements for guys!  That said, I decided to girly it up a bit to show you just how versatile this kit is!

I cut and assembled the hat pieces as per instructions on the easy to follow PDF file included with the kit.   I was going for a more natural look so didn't want the edges to be perfectly straight.  So once I added the hat rim, and while the glue was still a little wet, I curled the edges between my thumb and forefingers in a few places. Once the glue dried properly, the curves were set perfectly. 
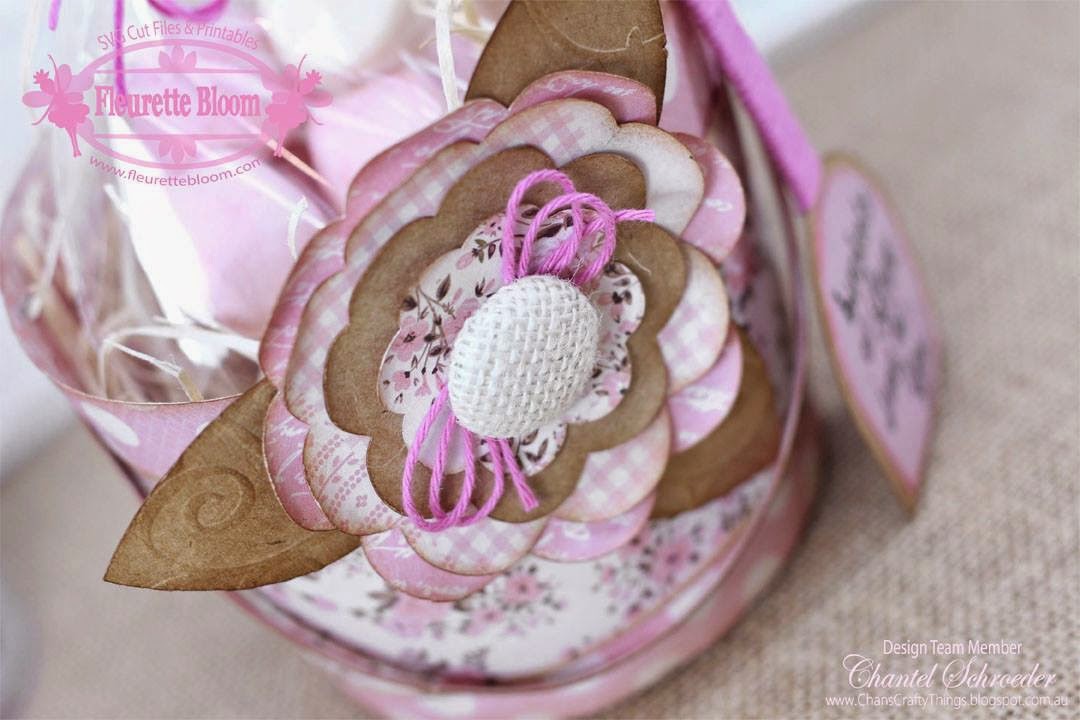
I didn't cut any of the accent pieces for the hat as I wanted to decorate it with some flowers instead.  I used the medium spiral roses from the New "Lush Flowers" 3D SVG Collection to make both the flowers.  I just scaled the one down slightly and cut them out of different coordinating papers to create some interest.

Finally, I added a couple of leaves from the same kit, some Kaisercraft pearls, and viola... it was ready to be filled with little treats.

I had a great time making this little hat and changing it up a bit.  Such a perfect little gift for any occasion.  I do hope you like  it too!

Thanks for stopping by!


Image Hosted by ImageShack.us

Wednesday 14 January 2015

Buckets of Love Valentines Gift - Day 4 of the Fleurette Bloom and Trendy Twine Inspiration Party

Hi everyone, welcome to Day 4 of the Fleurette Bloom and Trendy Twine's Inspiration Party!

I created this cute treat bucket - the perfect gift for someone special this Valentine's day.  The bucket file is from Fleurette Bloom's Beach Bucket 3D SVG Project Kit, It's super easy to put together and I just love how I was able to adapt a beach bucket to a Valentine's theme!

I just couldn't find the right stamp so I made my own using sketch pens in my Silhouette Cameo. I love this technique as you can choose the colour, font, and of course - the caption, to suit any project! I completed the spade by wrapping the handle with Totally Raspberry Trendy Twine.  I just love how it turned out.  
After I cut all the pieces of the flower, I thought it looked a bit flat.  So with a bit of twisting and bending of all the pieces for the flower, it really made it come to life.  As I didn't have anything in my stash to match, I decided to make the burlap button using my I-top tool and then added a Totally Raspberry Twine bow before adhering it to the flower. 
Finally, it was time to add the treats!  You can add anything of your choice of course, but I opted for good old marshmallows!  Who doesn't like those:)  I simply placed them in a cellophane bag and dressed it up with a mix of Totally Pink and Totally Raspberry Twine.   I think it looks good enough to eat, don't you?
 Now, who would like to win some Blog Candy?!

One lucky person will win the following:
$10 Gift Certificate to Trendy Twine

$10 Gift Certificate to Fleurette Bloom

To be eligible to win, here are the guidelines:
Our crafting inspiration party goes from Sunday, January 11th, through Saturday, January 17th. You will need to comment on both the Fleurette Bloom blog and the Trendy Twine blog each day for a chance to be entered. Deadline to enter is 10:00 p.m. Central Time, Sunday, January 18th. You must also be a follower of both blogs to be eligible to win. One person will win both gift certificates. Good luck and have fun being inspired all week long!

Thanks for stopping by and happy hopping!


Image Hosted by ImageShack.us

Friday 26 December 2014

Star Box Tree and Star Card - SVGCuts DT Project

Merry Christmas everyone!

I know this post is a bit late, but I had some unexpected computer issues and just couldn't get it out in time.  That said, I still wanted to share my latest SVGCuts DT project with you as I had so much fun making it.  Perhaps you could keep this one up your sleeve for next year...
Star Box Tree Close Up

The "tree" is made up of 5 small boxes and the "trunk" is a cute little drum which can be used afterwards as a pencil or treat holder.  The star boxes can each be filled with a small gift too!
Star Box Tree


Here's a closer look at the star card.  It was so quick and easy to put together, you won't believe it.  I just added a button, some ribbon and piece of Delilah Whimsy Farm Twine and there it was - all done!
Star Card


For those interested, here's the list of kits I used to make the Star Box Tree as well as the card.


The bow on top of the tree is just one for the many awesome FREE files from SVGCuts.  If you haven't done it yet, you really should check out their freebie collection.

Also, if you would like detailed instructions for this project and information on the paper used etc., head on over to my post on the the SVGCuts inspiration page.

Here's one more close up of the star tree... Don't you just love the paper?  I had it in my stash for so long as I've never wanted to cut it up!  So I glad I used it for this project though!

Well, I guess that's it for Christmas!  I do hope that you all had a wonderful Christmas and that 2015 will bring lots of love, laughter and crafty goodness your way! Thanks for stopping by and visiting my blog and Facebook page throughout the year.  I appreciate all of your kind comments so much and look forward to seeing you all again next year!


Image Hosted by ImageShack.us

Friday 19 December 2014

Snow Globe Shaker Card - Fleurette Bloom DT Project

Hi everyone,

No matter how well I plan, I always seem to need a few more cards in the last days just before Christmas.  This year of course was no different:)  

So, if you're anything like me and still need a few last minute cards, why not try one of these cute little snow globe cards that I made for my latest Fleurette Bloom DT project?  
Snow Globe Shaker Card
Isn't it adorable?  Well, not only is the snow man super cute, but what I love most about this card is that I was able to cut all the pieces (apart from the snowman) out of ONE piece of 12' x 12' cardstock.  Isn't that awesome?  

How did I do it you may ask?  Well, here's the scoop:

I used the Snow Globe card from the Holly Days Boxes and Cards Kit/Collection and imported all the required pieces into my software.  I then drew squares around the pieces and filled them with papers from Fleurette's New Merry and Bright Coordinating Paper Pack.  Here's a snapshot of the layout in my software:
Print and Cut Image

Before sending it to my printer, I ensured that all the outlines where set to no colour and I also set my cut lines at the same time.  By doing it this way, you will not only be able to see where your pieces are in the cut window, but you'll also be sure to get clean cuts with the print and cut feature.  This is such a good trick as your cuts will always look perfect even if the printer calibration is slightly off. 

Next I imported the Snow Man SVG Cut File and Printable and sized him down a touch so that he would fit into the snow globe.  Once all the pieces were cut out, I assembled him as usual and gave him a cute Peachy Keen stamped face which I coloured with watercolour pencils.  
Snow Globe Shaker Card Snow Man
Finally, to make the "glass" for the snow globe, I cut an acetate circle slightly larger than the center of the globe piece.  I used Glossy Accents to adhere the acetate onto the back of the top snow globe piece.  I then added some dimensional foam all around the back of the globe piece and put some fake snow in it before I adhered it onto the snow globe base.

A touch of ribbon and viola - one super cute snow globe card ready in time for Christmas!

Design tip:  Now that you've already designed the card in your software, why not make a few more?  By simply clicking on each block and filling it with different digital paper, you can make more cards with entirely different looks in no time!  

I hope that you've enjoyed my project and that the tips and tricks will assist you when you make some of your own.  If you do, I would love to see so please do share on my Facebook page or on Fleurette Bloom's page.  

Thanks for stopping by!


Image Hosted by ImageShack.us


Tuesday 16 December 2014

Wintergreen Gift Box Bouquet Centrepiece - SVGCuts DT Project

Hi again everyone,

I'm so happy to be able to share another one of my SVGCuts DT projects with you today. As I mentioned before, I just LOVE everything about Christmas.  Needless to say, decorating the table is one of my favourite things.

So for my next project, I made a table centerpiece with a twist.  I combined two concepts: a gift (after all, what would Christmas be without those), and a traditional Christmas bouquet (even though it's summer here in Oz, I still like the idea of Christmas being in the winter).  Anyways, this is what I came up with, a Wintergreen Gift Box Bouquet centrepiece...

Wintergreen Gift Box Bouquet
I started with a basic box (from the Christmas Gift Bags and Boxes SVG Kit) and tied a big bow around it.  I then arranged a whole bunch of pinecones and wintergreens from the 3D Wintergreens SVG Kit on top.  For measurements and full details on how I made it, feel free to pop over to the SVGCuts blog and read my post  

If you would like to win a copy of all the files needed to create this invitation, be sure to head over the SVGCuts Facebook page and leave a "comment" and "like" where they shared this project.  Remember, it's for a limited time only, so hurry on over!

In the meantime, here are some more photo's.  This one is a front view of the bouquet.  I've had this ribbon in my stash for ages and was waiting for the perfect occasion to use it. Well, I think I found it, lol!  Isn't it pretty?   
Wintergreen Gift Box Bouquet Centerpiece Front View

And here's a close up from the side... Those pinecones still amaze me - they're so easy to do and look so real!  Mary did such a great job in designing them! 
Wintergreen Gift Box Bouquet Centerpiece Close Up


This must be one of my favourite projects yet.  Whilst the wintergreens took quite some time to complete (as I made heaps of them to ensure the bouquet was nice and full), I found it quite therapeutic in a way.  The best part was when I finally got to the arranging stage - it was so rewarding to see the end result!

I really hope that you've enjoyed this project as much as I've enjoyed making it.  I also really hope that you will make one of your own.  Don't forget to share your creation on my Facebook page - I would love to see your take on it!

Thanks again for stopping by!


Image Hosted by ImageShack.us

Christmas Celebration Invitation - SVGCuts DT Project

Hi everyone,

I just love this time of the year! I just love Christmas... the food, the gifts, and of course, the company!  

So, for my latest SVGCuts DT project, I decided to do an invitation for a Christmas celebration.  If you're hosting this year, these will be perfect as you can make a whole bunch in no time at all.  Not only that, these will leave a lasting impression as the cut-out doubles up as a tree ornament so your guests can use it for years to come and always remember the occasion!  


For the actual invitation piece, I used sketch pens in my Silhouette Cameo to do the writing before I cut it out (I love that technique).  Here's a picture with the ornament on the side, revealing the invitation text on the inside. 

If you would like to win a copy of all the files needed to create this invitation, be sure to head over the SVGCuts Facebook page and leave a "comment" and "like" where they shared this project.  Remember, it's for a limited time only, so hurry on over!

For those interested, you can ready my post here for full details and instructions on how I created this one.  But for a quick reference, here's a list of the kits I used:


Here's a close up of the ornament cut-out and sketched text.  The pens I used have touch of glitter to them and I just love how it turned out!


I hope you've enjoyed my celebration invitation and that I've inspired you to make some of your own if you're hosting an event this year.  It really is a fun project and you will surely make a good impression even before the celebrations begin!

Thanks for stopping by!


Image Hosted by ImageShack.us

Saturday 13 December 2014

Personalised Christmas Coffee Mugs

Hi everyone,

Today I'm sharing something a little different...  I've been super busy with Christmas gifts over the past few weeks and thought I would share some of my latest creations with vinyl.

These mugs make super cute gifts - they're great as is, or you could fill them with treats and simply wrap them in clear cellophane.  Not only does this make for great presentation, but it will also save you from trying to gift wrap an awkward mug, lol.

For the first set of mugs, I used three different fonts (the one on top is the ever popular Samantha font) and sized the words until it looked about right.  I then created an internal offset for the word "Christmas" and moved it aside.  Once I was happy with the word placement, I welded them all together to create one cut file in pink.  I did the same for all the names and then cut 4 of the offset pieces out of white vinyl.  I love the layered look and it also breaks the pink a bit too.

The next set is for our local girl scouts so I wanted them to be a bit more fun and festive.  I stuck to traditional Christmas colours and used the Adore font (LOVE it) for the names.  The dots were drawn using basic shapes in my software. So simple and yet so effective don't you think?
Finally I added some cute candy canes to each mug.  The santa was a freebie file from Miss Kate Cuttables and I simply did a print and cut and then added a touch of glitter before adhering these cuties to some candy canes. 

These were heaps of fun to make!  Probably a good thing as I still have to do a whole bunch more, lol!
  
Thanks for stopping by!


Image Hosted by ImageShack.us